안녕하세요 서후아빠입니다. ^_^
이번 세션은 미리 구성된 EKS 클러스터에 ALB 및 NLB를 연결하여 Pod를 노출시키는 실습을 해보겠습니다. K8S의 Ingress는 ALB로 프로비저닝되고, K8S의 Service는 NLB로 프로비저닝됩니다.
아래 3가지 Case 중 가장 활용도가 높아 보이는 것은 Case 3이고, 가장 활용도가 낮은 경우는 Case 2로 판단됩니다.
사전 작업
Cloud9 환경 및 EKS 클러스터 생성 등은 아래 링크를 참조 바랍니다.
2023.06.02 - [Compute] - [실습] EKS - Cluster (eksctl, AWS 콘솔), Ingress Controller, Image
[실습] EKS - Cluster (eksctl, AWS 콘솔), Ingress Controller, Image
안녕하세요 서후아빠입니다. ^_^ 이번 세션은 미리 구성된 VPC에 eksctl과 AWS 콘솔을 각각 이용하여 EKS 클러스터를 배포하는 실습을 해보겠습니다. EKS 클러스터 배포는 AWS 콘솔, eksctl, CloudFormation, CD
sh-t.tistory.com
Case1. ALB 생성 및 ALB 이용하여 노출 (Service Type은 NodePort or ClusterIP)
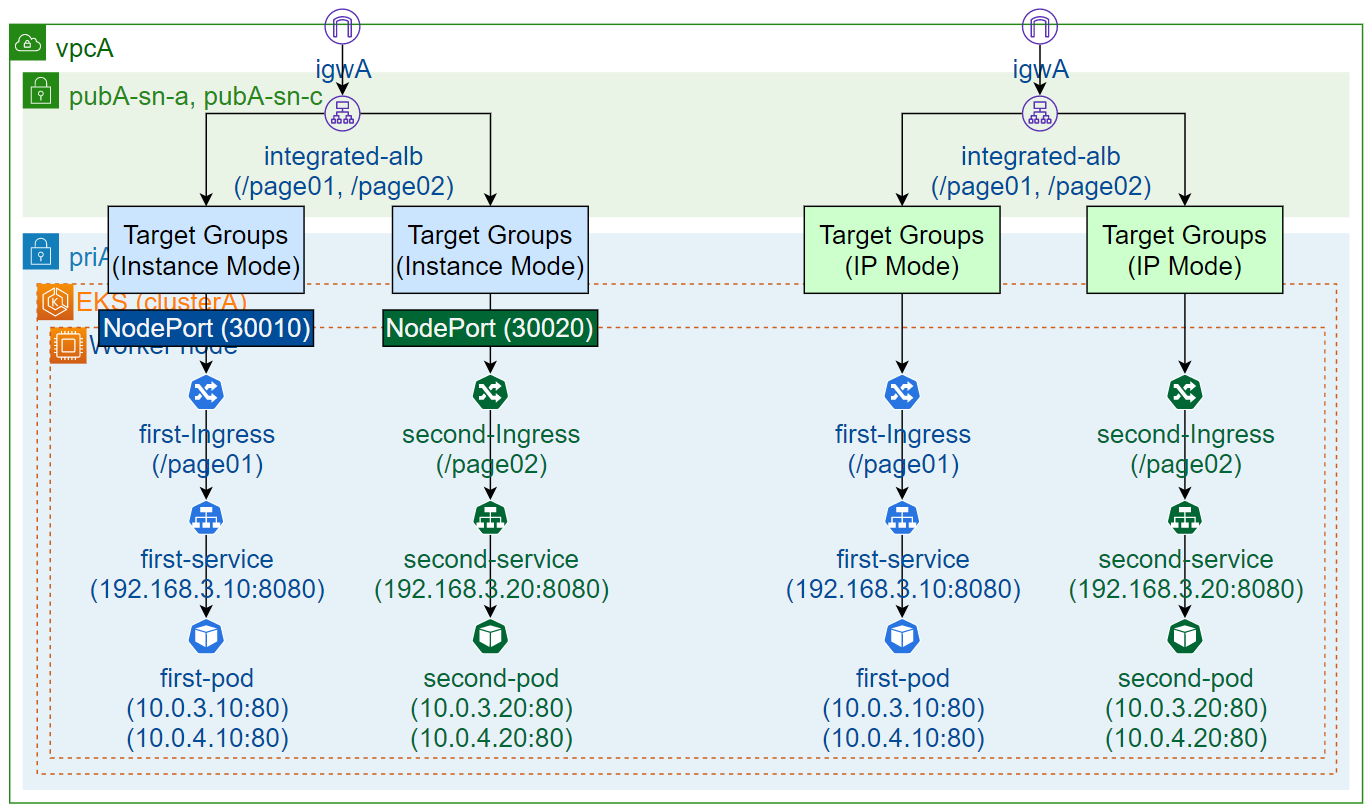
| Ingress의 rule은 ALB의 rule로 등록됨 2개의 ingress(first-ingress, second-ingress)를 1개의 Ingress로 생성할 경우 - 1개의 Ingress에 2개의 rule을 등록되도록 ingress.yaml 수정 - 단, ingress.yaml의 annotations에서 service별 설정이 다른 부분은 service.yaml의 annotations로 이동 NodePort를 사용하지 않는 IP Mode & ClusterIP 구성을 권고드립니다. |
샘플 yaml 파일 (deployment.yaml, service.yaml, ingress.yaml)
| 첨부 파일에서 Subnets와 security-groups은 수정해서 사용하시기 바랍니다. IPMode.txt와 InstanceMode.txt의 파일 차이점 - ingress.yaml의 alb.ingress.kubernetes.io/target-type : ip or instance - service.yaml의 spec.type : ClusterIP or NodePort ※ NodePort : ingress.yaml의 target-type을 ip로 설정하더라도 동작은 Instance Mode처럼 동작 ALB를 Service별로 배포할 경우는 NonALBShared 샘플을 사용하시기 바랍니다. |
애플리케이션 및 ALB 배포
# 작업 폴더 생성 (첨부 파일의 내용을 여기에 붙여넣기)
mkdir -p ~/environment/clusterA/elb/alb-shared
mkdir -p ~/environment/clusterA/elb/alb-non-shared
cd ~/environment/clusterA/elb/alb-shared

# 배포 및 결과 확인 (alb-non-shared 폴더도 진행)
kubectl apply -f first-deployment.yaml
kubectl apply -f second-deployment.yaml
kubectl apply -f first-service.yaml
kubectl apply -f second-service.yaml
kubectl apply -f first-ingress.yaml
kubectl apply -f second-ingress.yaml
kubectl get pod
kubectl get service
kubectl get ingress

# unhealthy 경우 : pod에 접속하여 디버깅하는 방법
kubectl get pod
kubectl exec -it <pod-name> /bin/bash
root@xxx# netstat -tupan | grep 80      // 80 리슨 상태 확인
root@xxx# tcpdump -nni any port 80      // alb에서 healthy check 패킷 확인
root@xxx# exit| EC2 > Load Balancers, Target Groups : 생성된 리소스 확인 Target Groups에서 Health status가 비정상일 경우 - Pod는 Worker Node 내부에 있기 때문에 Worker Node와 연결된 보안그룹에 영향을 받습니다. - Worker Node의 보안그룹 수정 : 출발지 alb의 보안그룹, 포트는 Pod의 리슨포트(위 예시에서는 80) 허용 |
애플리케이션 연결
EC2 > Load Balancers > 생성된 alb 선택 : DNS name 확인
http://xxxxxxxx.ap-northeast-2.elb.amazonaws.com/page01/index.html > It page01! 출력
http://xxxxxxxx.ap-northeast-2.elb.amazonaws.com/page02/index.html > It page02! 출력
| Path(/page01, /page02) 기반으로 Ingress 동작 상태를 확인할 수 있습니다. ingress.yaml에서 ACM 인증서를 연결한 경우, HTTPS 접속 및 HTTP to HTTPS Redirect도 테스트해 보시기 바랍니다. |
Case2. NLB 생성 및 NLB 이용하여 노출 (Service Type은 LoadBalancer)
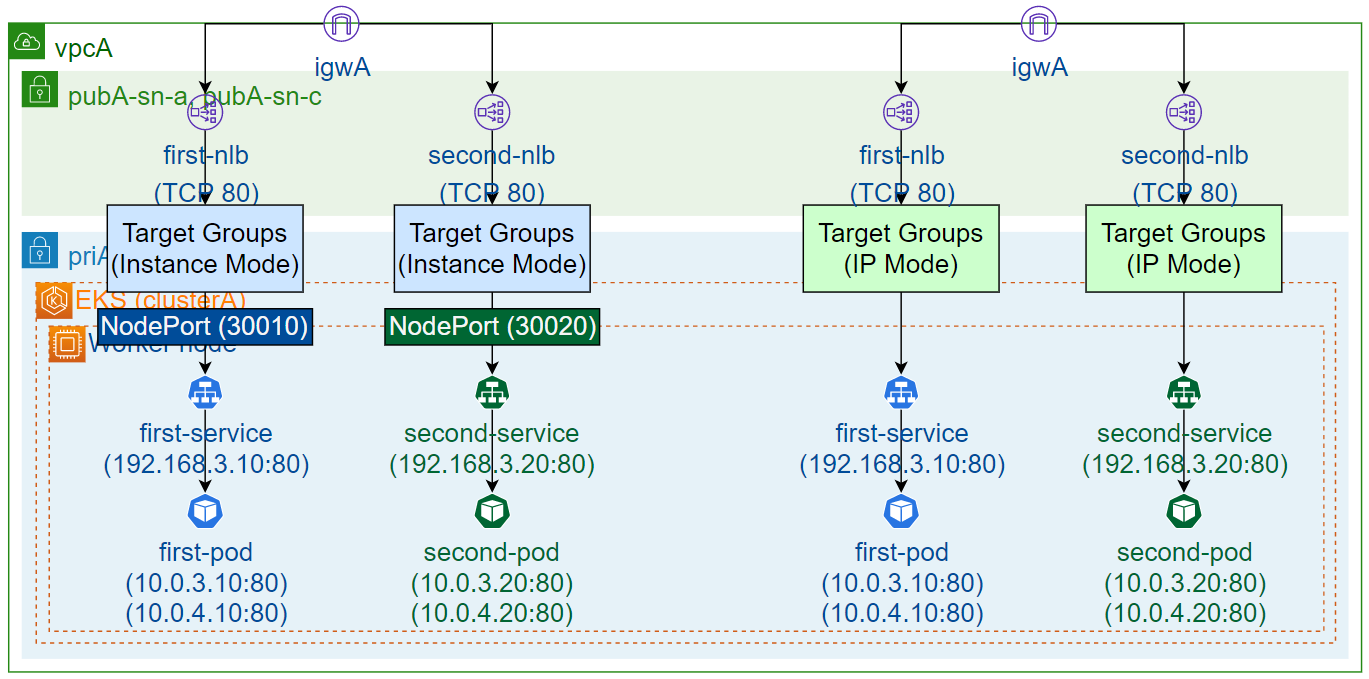
샘플 yaml 파일 (deployment.yaml, service.yaml)
| 첨부 파일에서 Subnets은 수정해서 사용하시기 바랍니다. |
애플리케이션 및 NLB 배포
# 작업 폴더 생성 (첨부 파일의 내용을 여기에 붙여넣기)
mkdir -p ~/environment/clusterA/elb/nlb-non-shared
cd ~/environment/clusterA/elb/nlb-non-shared

# 배포 및 결과 확인
kubectl apply -f first-deployment.yaml
kubectl apply -f second-deployment.yaml
kubectl apply -f first-service.yaml
kubectl apply -f second-service.yaml
kubectl get pod
kubectl get service| EC2 > Load Balancers, Target Groups : 생성된 리소스 확인 Target Groups에서 Health status가 비정상일 경우 - Pod는 Worker Node 내부에 있기 때문에 Worker Node와 연결된 보안그룹에 영향을 받습니다. - Worker Node의 보안그룹 수정 : 출발지 Any, 포트는 Pod의 리슨포트(위 예시에서는 80) 허용 |
애플리케이션 연결
EC2 > Load Balancers > 생성된 nlb 선택 : DNS name 확인
http://xxxxxxxx.ap-northeast-2.elb.amazonaws.com/page01/index.html > It page01! 출력
http://xxxxxxxx.ap-northeast-2.elb.amazonaws.com/page02/index.html > It page02! 출력
Case3. 기존 배포된 ELB 및 TargetGroup 연결 (TargetGroupBinding, Multi Cluster)
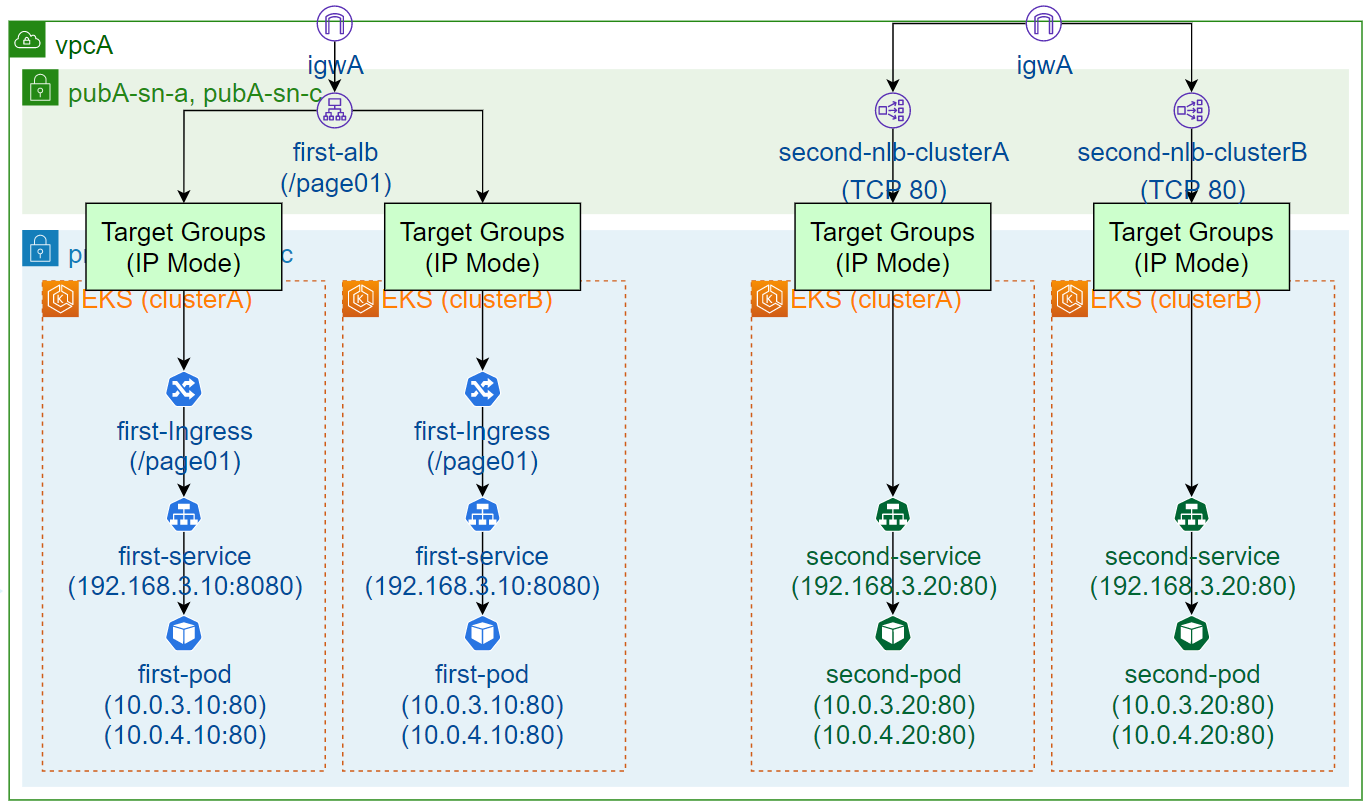
| Multi Cluster 환경 구성을 위해서 2개의 Cluster(A, B)를 배포하도록 합니다. NLB는 2개의 Target group을 연결할 수 없기 때문에 각각 NLB를 생성하고 Route 53을 통해서 부하분산 처리되도록 구성합니다. |
샘플 yaml 파일 (deployment.yaml, service.yaml, targetgroupbinding.yaml)
| 첨부 파일에서 targetGroupARNups은 수정해서 사용하시기 바랍니다. |
Target Groups 생성
EC2 > Target groups > Crete target group
| 구분 | Specify group details | Register targets | ||
| ALB 경우 | Choose a target type : IP addresses Target group name : first-alb-clusterA Protocol:Port : HTTP:80 VPC : vpcA Health check protocol : HTTP Health check path : / |
N/A | ||
| NLB 경우 | Choose a target type : IP addresses Target group name : second-nlb-clusterA Protocol:Port : TCP:80 VPC : vpcA Health check protocol : TCP |
N/A | ||
| Target grup name을 clusterB로도 각각 1개씩 만들어 모두 4개를 생성합니다. |
ELB 생성
EC2 > Load balancers > Compare and select load balancer type > ALB or NLB 선택
| 구분 | Basic configuration | Network mapping | Security groups | Listeners and routing |
| ALB 경우 | Load balancer name : first-alb Scheme : Internet-facing |
VPC : vpcA Subnet : pubA-sn-a, pubA-sn-c |
80 허용된 sg 선택 | Protocol:Port : HTTP:80 Default action : first-alb-clusterA |
| NLB 경우 | Load balancer name : second-nlb-clusterA Scheme : Internet-facing |
VPC : vpcA Subnet : pubA-sn-a, pubA-sn-c |
- | Protocol:Port : TCP:80 Default action : second-nlb-clusterA |
| ALB는 Listeners에서 Target group을 추가합니다. - EC2 > Load balancers > first-alb 선택 > Listeners (tab) > HTTP:80 선택 > Actions > Edit listener - Target group에서 first-alb-clusterB 추가, Weight는 first-alb-clusterA와 동일하게 설정 NLB는 Target group을 추가할 수 없으므로 second-nlb-clusterB를 별도로 생성합니다. |
애플리케이션 및 TargetGroupBinding 배포
# 작업 폴더 생성 (첨부 파일의 내용을 여기에 붙여넣기, clusterB도 진행)
mkdir -p ~/environment/clusterA/elb/targetgroupbinding
cd ~/environment/clusterA/elb/targetgroupbinding

# 배포 및 결과 확인 (clusterA, clusterB에 각각 실행)
kubectl apply -f first-deployment.yaml
kubectl apply -f second-deployment.yaml
kubectl apply -f first-service.yaml
kubectl apply -f second-service.yaml
kubectl apply -f first-targetgroupbinding.yaml
kubectl apply -f second-targetgroupbinding.yaml
kubectl get pod
kubectl get service
kubectl get targetgroupbinding| 주의 : clusterA에서 배포하고, 동일한 인스턴스에서 clusterB를 배포하려면 아래 순서대로 진행하셔야 합니다. - 참고 : https://sh-t.tistory.com/170 > 3단계 : Cluster 접근 - 접근 가능한 클러스터 조회 : kubectl config get-contexts - 현재 연결된 클러스터명 확인 : kubectl config current-context - 연결 클러스터 전환 : kubectl config use-context 클러스터명 |
EC2 > Target groups > 생성된 대상 그룹 선택 : pod 연결 확인
애플리케이션 연결
EC2 > Load Balancers > 생성된 ELB 선택 : DNS name 확인
http://xxxxxxxx.ap-northeast-2.elb.amazonaws.com/page01/index.html > It page01! 출력 (alb 경우)
http://xxxxxxxx.ap-northeast-2.elb.amazonaws.com/page02/index.html > It page02! 출력 (nlb 경우)
| NLB는 2개이므로 Route 53에서 묶어주는 과정이 필요합니다. (소유한 퍼블릭 도메인 필요) 1. Route 53 > Hosted zones > 퍼블릭 도메인 선택 > Create record - Record name : www - Alias : Enable - Route traffic to : Alias to Network Load Balancer, ap-northeast-2, second-nlb-clusterA 선택 - Routing policy : Weighted, Weight 200 - Record ID : second-nlb-clusterA 2. Route 53 > Hosted zones > 퍼블릭 도메인 선택 > Create record - Record name : www - Alias : Enable - Route traffic to : Alias to Network Load Balancer, ap-northeast-2, second-nlb-clusterB 선택 - Routing policy : Weighted, Weight 200 - Record ID : second-nlb-clusterB 3. 웹브라우저에서 접속 테스트 : http://www.퍼블릭 도메인/page02/index.html |
Worker Node의 iptables
Service가 NodePort or LoadBalancer인 경우
# Worker Node SSH 접속하여 아래 진행
sh-4.2$ sudo su
[root@ip-10-0-6-37 bin]# iptables -v --numeric --table nat --list KUBE-SERVICES | grep -E '(pkts|NODEPORTS|first|second)'
 pkts bytes target                     prot opt in     out  source     destination
    0     0 KUBE-SVC-RT6Z567TAZEPWF7E  tcp  --  *      *    0.0.0.0/0  192.168.3.10  /* default/first cluster IP */ tcp dpt:8080
    0     0 KUBE-SVC-Q2BJ2O5BU2E6VMOL  tcp  --  *      *    0.0.0.0/0  192.168.3.20  /* default/second cluster IP */ tcp dpt:8080
  508 30480 KUBE-NODEPORTS             all  --  *      *    0.0.0.0/0  0.0.0.0/0     /* kubernetes service nodeports; NOTE: this must be the last rule in this chain */ ADDRTYPE match dst-type LOCAL

[root@ip-10-0-6-37 bin]# iptables -v --numeric --table nat --list KUBE-NODEPORTS
 pkts bytes target                     prot opt in     out  source     destination
    2   120 KUBE-EXT-RT6Z567TAZEPWF7E  tcp  --  *      *    0.0.0.0/0  0.0.0.0/0     /* default/first */ tcp dpt:30010
    1    60 KUBE-EXT-Q2BJ2O5BU2E6VMOL  tcp  --  *      *    0.0.0.0/0  0.0.0.0/0     /* default/second */ tcp dpt:30020

[root@ip-10-0-6-37 bin]# iptables -v --numeric --table nat --list KUBE-SVC-RT6Z567TAZEPWF7E
Chain KUBE-SVC-RT6Z567TAZEPWF7E
 pkts bytes target                     prot opt in     out  source     destination
    2   120 KUBE-SEP-R4HBOPGGKSJXG7HJ  all  --  *      *    0.0.0.0/0  0.0.0.0/0     /* default/first -> 10.0.3.10:80 */
    1    60 KUBE-SEP-KSJXG7HJR4HBOPGG  all  --  *      *    0.0.0.0/0  0.0.0.0/0     /* default/first -> 10.0.4.10:80 */

[root@ip-10-0-6-37 bin]# iptables -v --numeric --table nat --list KUBE-SVC-Q2BJ2O5BU2E6VMOL
Chain KUBE-SVC-Q2BJ2O5BU2E6VMOL
 pkts bytes target                     prot opt in     out  source     destination
    2   120 KUBE-SEP-447GSLKTFD3XFBEF  all  --  *      *    0.0.0.0/0  0.0.0.0/0     /* default/second -> 10.0.3.20:80 */
    1    60 KUBE-SEP-TFD3XFBEF447GSLK  all  --  *      *    0.0.0.0/0  0.0.0.0/0     /* default/second -> 10.0.4.20:80 */

[root@ip-10-0-6-37 bin]# curl localhost:30010/page01/index.html
<html><body><h1>It page01!</h1></body></html>

[root@ip-10-0-6-37 bin]# curl localhost:30020/page02/index.html
<html><body><h1>It page02!</h1></body></html>| target-type(ip or instance) 관계없이 모두 Worker Node의 iptables PREROUTING 체인 정책을 통해 Pod 서비스까지 접근하게 됩니다. - iptables : kube-proxy 통해 관리되며, Service가 많아지면 iptables 정책도 복잡해지므로 성능 이슈가 발생할 수 있음 IP Mode와 Instance Mode 차이점 (EC2 > Target Groups > 대상 그룹 선택 > Targets (tab) - ip mode : Protocl:Port(ex : HTTP:80), Target의 ID(Pod IP), Target의 Port(ex : 80) - instance mode : Protocl:Port(ex : HTTP:30010), Target의 ID(Worker Node), Target의 Port(ex : 30010) |
Service가 ClusterIP인 경우
# Worker Node SSH 접속하여 아래 진행
sh-4.2$ sudo su
[root@ip-10-0-6-37 bin]# iptables -v --numeric --table nat --list KUBE-SERVICES | grep -E '(pkts|NODEPORTS|first|second)'
 pkts bytes target                     prot opt in     out  source     destination
    0     0 KUBE-SVC-RT6Z567TAZEPWF7E  tcp  --  *      *    0.0.0.0/0  192.168.3.10  /* default/first cluster IP */ tcp dpt:8080
    0     0 KUBE-SVC-Q2BJ2O5BU2E6VMOL  tcp  --  *      *    0.0.0.0/0  192.168.3.20  /* default/second cluster IP */ tcp dpt:8080
  508 30480 KUBE-NODEPORTS             all  --  *      *    0.0.0.0/0  0.0.0.0/0     /* kubernetes service nodeports; NOTE: this must be the last rule in this chain */ ADDRTYPE match dst-type LOCAL

[root@ip-10-0-6-37 bin]# iptables -v --numeric --table nat --list KUBE-NODEPORTS

[root@ip-10-0-6-37 bin]# iptables -v --numeric --table nat --list KUBE-SVC-RT6Z567TAZEPWF7E
Chain KUBE-SVC-RT6Z567TAZEPWF7E
 pkts bytes target                     prot opt in     out  source     destination
    2   120 KUBE-SEP-R4HBOPGGKSJXG7HJ  all  --  *      *    0.0.0.0/0  0.0.0.0/0     /* default/first -> 10.0.3.10:80 */
    1    60 KUBE-SEP-KSJXG7HJR4HBOPGG  all  --  *      *    0.0.0.0/0  0.0.0.0/0     /* default/first -> 10.0.4.10:80 */

[root@ip-10-0-6-37 bin]# iptables -v --numeric --table nat --list KUBE-SVC-Q2BJ2O5BU2E6VMOL
Chain KUBE-SVC-Q2BJ2O5BU2E6VMOL
 pkts bytes target                     prot opt in     out  source     destination
    2   120 KUBE-SEP-447GSLKTFD3XFBEF  all  --  *      *    0.0.0.0/0  0.0.0.0/0     /* default/second -> 10.0.3.20:80 */
    1    60 KUBE-SEP-TFD3XFBEF447GSLK  all  --  *      *    0.0.0.0/0  0.0.0.0/0     /* default/second -> 10.0.4.20:80 */
참고 URL
'Networking' 카테고리의 다른 글
| [실습] OS별 포트 포워딩(Port Forwarding) 설정/해제 (0) | 2024.05.23 |
|---|---|
| [이론] 네트워크 및 보안장비 구성 (0) | 2024.04.30 |
| [실습] AWS Direct Connect 구성하기 (0) | 2022.10.25 |
| [이론] AWS Direct Connect 기본 개념 (0) | 2022.10.25 |
| [실습] AWS Client VPN 구성하기 (OpenVPN, 구글OTP 2차 인증)-2편 (0) | 2022.09.20 |

